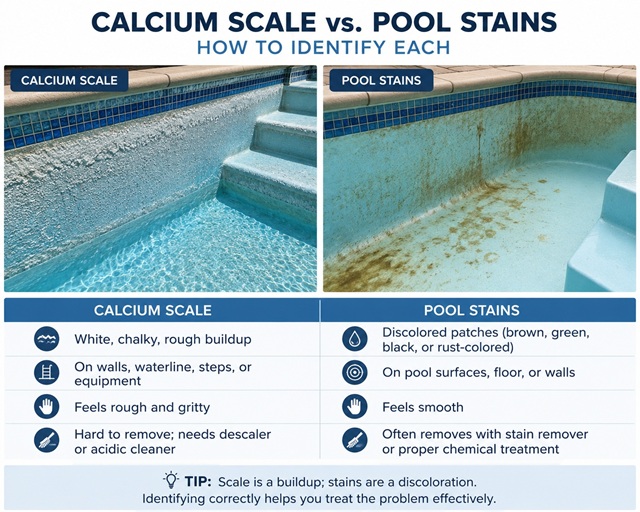
Proper pool maintenance starts with identifying pool stains and distinguishing them from mineral buildup or surface damage. Accurate pool stain identification begins with four observations: color, texture, location, and response to a small spot test. Color can narrow the possibilities, while texture and testing usually provide the strongest evidence. Knowing how to identify pool stains before treatment helps avoid using the wrong chemistry or cleaning method.
How To Identify Pool Stains Vs. Mineral Buildup
Start by brushing the area and feeling it with a gloved hand. Check whether the affected area represents added material, discoloration within the finish, or missing surface material.
A typical pool stain changes the color of the surface without adding much thickness and usually feels similar to the surrounding finish. It may have soft, blurred, irregular, or drip-shaped edges and can respond to vitamin C, chlorine, or a commercial stain-identification product. It often develops beneath debris, around metal fittings, or in areas with poor circulation.
Mineral buildup sits above the original surface. It feels rough, gritty, chalky, crystalline, or crusty and may snag a sponge, cloth, or pool brush. It frequently forms a visible ridge along the waterline and accumulates around tile grout, spillways, returns, heaters, and salt-chlorine cells. It may have a raised edge, fill the spaces between exposed aggregate, catch the light differently, or feel rougher than a nearby unaffected area.
Calcium scale in pool waterlines and finishes is commonly grayish-white and crusty, although dirt, oils, algae, iron, or copper can discolor the deposit. High calcium hardness can contribute to scaling when the rest of the water chemistry allows calcium carbonate to precipitate.
Surface damage has a different profile. Etching, worn plaster, delamination, cracks, exposed aggregate, and liner fading often appear recessed, pitted, blistered, or structurally uneven. These areas generally remain unchanged after stain spot tests.
The timing of the discoloration can provide another clue. A mark that appears soon after shocking the pool, increasing the pH, or adding an oxidizer may be caused by dissolved metals precipitating onto the surface. Scale generally develops progressively, although it may become visible suddenly when the water level drops.
What Does Calcium Scale Look Like In A Pool And Feels Like
Calcium scale usually appears as a white, off-white, or light-gray deposit. Fresh carbonate scale may look like a cloudy film, fine powder, or thin chalky coating. Older deposits can become hard, layered, and crust-like.
Common forms of calcium scale deposits in pool areas include a rough white band at the normal waterline, chalky deposits across tile and grout, gray-white patches on plaster or exposed aggregate, crystalline buildup around raised spas and spillways, white flakes returning to the pool from a saltwater chlorine generator, and a hard coating inside heaters, plumbing, or chlorinator cells.
When viewed from the side or under low-angle light, the deposit may cast a slight shadow, reflect light unevenly, or appear thicker than the surrounding finish.
Calcium carbonate is the most common form of pool scale. It tends to be chalkier and more responsive to controlled scale-removal methods. Calcium silicate is generally denser, harder, grayer, and slower to remove. Products and procedures designed for carbonate scale may produce limited results on silicate deposits.
On exposed-aggregate pools, natural roughness should not automatically be diagnosed as scale. Look for a new coating across the stones, mineral deposits filling the spaces between them, or a texture that differs from a nearby section of the same finish.
Waterline scale may also be covered by sunscreen, body oils, dirt, and other residue. This can make the deposit appear yellow, gray, or brown instead of white and may give it a waxy outer layer over a harder mineral base.
Pool Stain Identification By Color, Texture, And Location
For reliable pool stain identification, color should be treated as a preliminary clue. Several unrelated pool problems can produce similar shades. The shape and distribution of the mark can be more useful than color alone.
Rust, orange, yellow, or reddish brown
These colors commonly suggest iron. Iron may enter through well water, municipal fill water, fertilizer runoff, corroding equipment, rusty objects, or exposed reinforcing steel. Leaves, acorns, wood, and other organic debris can also leave yellow-brown marks.
An isolated rust-colored dot may indicate a screw, hairpin, tool fragment, or another metal object. Broad brown staining after filling or shocking the pool points more strongly toward dissolved metals. Circular stains may indicate that a metal object rested on the surface. Leaf-shaped or sharply outlined brown marks often come from organic debris.
Blue-green, turquoise, teal, or dark gray
These shades often indicate copper. Possible sources include copper-based algaecides, corroding heater components, mineral systems, or low-pH water passing through copper plumbing. Copper can also combine with other compounds and create gray, black, or purple discoloration.
Purple, violet, or black
Dark purple or black marks may involve manganese, copper, cobalt, black algae, trapped debris, or deterioration beneath a fiberglass or plaster surface. The texture and spot-test response are essential for narrowing the cause.
Purple or violet crystals can form when copper interacts with elevated cyanuric acid. These deposits may be mistaken for manganese staining or black algae, so both copper and cyanuric acid should be checked.
Green, yellow-green, mustard, or black growth
These colors frequently indicate algae when the material feels slimy, dusty, velvety, or brushes away. Black algae usually appears as small, stubborn dots or clusters on porous concrete, plaster, or aggregate finishes.
White, cream, or gray
White and gray areas may be calcium scale, plaster dust, efflorescence, finish mottling, bleaching, fading, or etching. A hard protruding nodule emerging from a crack may indicate a finish or shell issue requiring professional inspection.
Location patterns
At the waterline, a mark may indicate evaporation scale, body oils, sunscreen residue, dirt, or a combined organic-mineral ring. On the pool floor beneath trees, it may come from leaves, berries, acorns, worms, soil, or fertilizer. Metal staining is often more visible on light-colored, highly illuminated steps and shallow shelves.
Marks or streaks near returns and fill lines can point to metals, minerals, or other contaminants entering from equipment or source water. Vertical trails may form when metal-rich water drips down a wall.
Around a heater outlet, marks may indicate scale or copper associated with heat and equipment conditions. Shaded corners and low-circulation areas commonly collect algae and trapped organic material. Around ladders, lights, fittings, or drains, marks may indicate rust, galvanic corrosion, or metal staining. Repeating discoloration along cracks may indicate material emerging from beneath the finish, water migration, or structural conditions.
Lighting also matters. Inspect the pool under natural daylight as well as with the pool light off. Artificial and low-angle lighting can exaggerate finish texture, waviness, mottling, and color variation.
How Causes Help Identify Pool Stains
To identify pool stains more accurately, consider what happened immediately before the mark appeared.
Metal stains
Metals can enter through fill water or develop through corrosion associated with unbalanced water. Copper-containing treatments can also stain surfaces when copper falls out of solution. Metal staining may develop after the pool is shocked, the pH rises, source water is added, or a heater begins corroding.
Organic debris stains
Organic stains often appear beneath leaves, acorns, berries, twigs, worms, mulch, or soil. They tend to have irregular edges that resemble the object that rested on the surface.
Fresh organic marks may fade after the debris is removed, the area is brushed, and normal sanitizer circulation resumes. Older tannin stains may require a localized chlorine-compatible treatment.
Algae
Algae usually has a physical presence. It may feel slippery, dusty, fuzzy, or slightly raised. Brushing often releases a visible cloud into the water.
Growth frequently begins in shady areas, behind ladders, around steps, inside light niches, beneath removable fittings, and in circulation dead spots. It may reappear quickly after brushing when the underlying sanitation problem remains.
Surface damage
Surface damage rarely behaves like a removable stain. Common signs include pitting or erosion, a rough area that sits below the surrounding finish, cracks, blisters, or hollow-sounding plaster, exposed aggregate or reinforcing steel, permanent liner fading or bleaching, fiberglass discoloration beneath the gel coat, and repeating patterns that follow application marks or repair boundaries.
Surface damage may become more visible when wet. A faded liner, deteriorated fiberglass gel coat, or etched plaster can appear darker underwater even though no removable stain is present.
Chemical stain treatments will not restore missing, faded, delaminated, or structurally damaged material. These conditions may require resurfacing, patching, liner replacement, gel-coat repair, or structural evaluation.
Some apparent stains are normal finish variations. Cement-based plaster and exposed-aggregate surfaces may contain broad cloudy areas, uneven shading, or differences in aggregate concentration caused by application and curing. These areas generally lack distinct edges, do not sit above the surface, and do not react to vitamin C or chlorine spot tests.
Spot Tests For Identifying Pool Stains
When identifying pool stains, perform every test on a small area first. Check the pool-surface manufacturer’s guidance, particularly for vinyl, fiberglass, painted finishes, and specialty aggregates. Take photographs before and after each spot test from the same distance and lighting angle. Small changes can be difficult to judge from memory.
The brush and texture test
Brush the area with a tool approved for the pool surface. Material that lifts into the water may be algae, dirt, or a soft deposit. A flat mark that remains after brushing may be a stain. A hard, raised patch suggests scale. A recessed, pitted, or cracked area suggests surface damage.
The vitamin C test for metal stains
Hold a plain vitamin C tablet against the stain for approximately two minutes. Crushed vitamin C can also be placed in a clean white sock and pressed against the area.
Rapid lightening strongly indicates a metal stain, particularly iron. Vitamin C is ascorbic acid, which can reduce oxidized metals and temporarily return them to a more soluble form.
A successful test identifies the stain category. It does not remove the metal from the pool. A full treatment plan may still require a sequestrant, filtration strategy, source-water management, or equipment inspection.
A vitamin C test may remove the brown or green color from a mixed deposit while leaving a rough white base behind. That result suggests metal staining attached to calcium scale rather than a pure metal stain.
The chlorine test for organic staining
A localized chlorine test can help identify organic discoloration. When a chlorine-compatible test product lightens the mark, the stain is probably organic or biological.
Concentrated chlorine can bleach vinyl, damage some finishes, and create a permanent light spot. Never leave a chlorine tablet resting unattended on a pool finish.
A chlorine test may lighten organic discoloration without eliminating algae embedded in a porous surface. Watch the area for several days. Rapid regrowth indicates a biological problem rather than a one-time debris stain.
Water testing
Test at least pH, total alkalinity, calcium hardness, water temperature, free chlorine, and cyanuric acid. Test iron and copper when metal staining is suspected.
Calculate the water’s saturation index using accurate results. Scale-forming water strengthens a calcium-scale diagnosis. A negative or balanced reading does not prove that an old deposit is absent, since chemistry may have changed after the deposit formed.
A clean white bucket can also help. Compare pool water with clear source water against a white background. If the bucket water itself appears tinted, the discoloration may be suspended or dissolved in the water. If the water looks clear but the pool surface remains discolored, a surface deposit, stain, or finish problem is more likely.
Professional carbonate test
Calcium carbonate reacts with acid and may fizz or soften during a controlled professional test. Homeowners should avoid experimenting with muriatic acid on submerged surfaces. Acid can etch plaster, discolor finishes, damage grout, and cause serious injury. Chlorine and acid must never be mixed or stored where their fumes can combine.
A commercial stain-identification kit provides a safer option when vitamin C and surface observations do not produce a clear answer. These kits support pool stain identification by using several topical treatments to identify which chemistry affects the stain. Use a pool professional for sensitive surfaces.
Use treatment response to identify pool stains more confidently rather than relying on a single test.
Causes Of Calcium Scale Buildup In Swimming Pools
Calcium scale in pool water forms when the water becomes oversaturated with calcium carbonate. This tendency is evaluated with the Langelier Saturation Index, or LSI.
The main contributing factors are high pH, high total alkalinity, high calcium hardness, warm water, high dissolved-solids levels, repeated evaporation and refill cycles, hard source water, rapid pH increases during aeration or new-plaster curing, localized high-pH conditions inside salt-chlorine cells, and heated surfaces inside heaters and spas.
Calcium hardness alone does not determine whether a pool will scale. The combined effect of pH, alkalinity, hardness, temperature, and dissolved solids determines calcium-carbonate saturation. LSI readings above approximately +0.30 indicate scale-forming conditions.
Evaporation makes waterline tile particularly vulnerable to calcium scale deposits in pool environments. Water evaporates from the surface and leaves its dissolved calcium, salts, oils, and contaminants behind. Repeated wetting and drying gradually creates a visible ridge. Frequent top-offs can gradually increase calcium and dissolved solids because evaporation removes water while leaving minerals behind.
Saltwater pools may release white calcium flakes when localized high pH causes scale to form inside the chlorine-generating cell. Regular heater use can promote localized scaling because warm surfaces increase the likelihood of calcium carbonate precipitation. New plaster can raise the pH during curing, creating scale-forming conditions even when the water is balanced later.
Certain chemical additions can also create temporary high-pH zones before they fully disperse. Scale may form in those areas even when a later whole-pool test appears acceptable.
Operating history can reveal causes that a current water test misses. Previous test records, refill frequency, recent chemical additions, water temperature, heater operation, and salt-cell maintenance history should all be considered.
Confirming Calcium Scale In Pool Vs. Stains
When identifying pool stains and mineral buildup, a strong calcium-scale diagnosis usually includes several matching clues rather than a single observation.
Compare the area with a nearby unaffected section of the same material. This is especially important for naturally rough plaster and exposed-aggregate finishes. View the area from several angles and run a gloved finger across it in different directions.
Brushing removes little or no material. A professional acid-response test softens or fizzes the deposit, and a scale-removal product gradually softens the area.
Calcium-carbonate scale should gradually soften when the pool is maintained within an appropriate, safely controlled saturation range and brushed regularly. A deposit that does not soften may be calcium silicate, a mixed deposit, or damaged finish material.
How To Get Rid Of Calcium Scale In Pool
Treatment of calcium scale in pool surfaces depends on the type of scale, its thickness, and the pool surface. The most efficient treatment sequence is simple: identify the material, test the water, perform one controlled spot test, confirm surface compatibility, and treat the smallest practical area before applying a whole-pool procedure.
Correct the water balance first
Test the water accurately and calculate the LSI. Scale-removal programs commonly hold the water in a controlled, slightly negative LSI range so existing calcium carbonate can gradually return to solution. Orenda describes a range of approximately –0.30 to –0.01 for this process.
Avoid driving the water aggressively corrosive. Excessively low pH or LSI can etch plaster, damage grout, corrode metals, and shorten equipment life.
Remove light carbonate scale
For fresh or light calcium scale deposits in pool finishes, maintain the prescribed water balance, brush the affected areas regularly, use a pool-surface-compatible scale remover or chelating product, keep the filter operating and clean it as deposits loosen, and monitor pH and LSI throughout treatment.
Chemical softening often takes days or weeks. Heavy scale rarely disappears after one application. If an appropriate treatment produces no measurable change, stop repeating it and reconsider the diagnosis.
Treat layered and mixed deposits in stages. Waterline buildup may contain oils and dirt over calcium scale, so the organic coating may need to be removed before a scale treatment can reach the mineral underneath.
Treat waterline tile
Use a cleaner approved for the specific tile and grout. A pumice stone may be suitable for some hard ceramic tile and certain plaster surfaces when kept wet and used carefully.
Pumice, abrasive pads, razor blades, and aggressive acids can scratch glass tile, vinyl, fiberglass, painted finishes, soft stone, and some decorative surfaces. Test an inconspicuous area or hire a specialist. Thick waterline scale may require professional media blasting with a material selected for the tile.
Treat plaster and aggregate finishes
Controlled brushing and scale-removal chemistry are appropriate starting points. Extensive deposits may require professional polishing, sanding, media blasting, or an acid wash.
An acid wash removes a thin layer of cementitious finish along with the deposit. It shortens the usable life of the surface and should be reserved for conditions that justify the material loss.
Treat vinyl and fiberglass pools
Use soft brushes and products explicitly approved for vinyl or fiberglass. Avoid pumice, metal scrapers, undiluted acid, and abrasive stain blocks unless the manufacturer specifically authorizes them.
Some fiberglass discoloration develops beneath the gel coat or from cobalt-related conditions. A surface professional may need to distinguish these issues from removable scale.
Clean a salt-chlorine generator
Turn off power and follow the cell manufacturer’s cleaning procedure. Begin with a strong water rinse. Use an acid-cleaning solution only when the manual calls for it and visible scale remains. Frequent acid cleaning can damage cell coatings and reduce service life. Pentair similarly recommends rinsing first and using an acid wash according to the equipment instructions when necessary.
Organic stains
Remove the debris, brush the area, restore the appropriate sanitizer level, and run the circulation system. A chlorine-compatible spot treatment may help on durable plaster surfaces. Enzyme products can assist with oils and other nonliving organic contamination.
Metal stains
Confirm the diagnosis with vitamin C or a stain-identification kit. Ascorbic or citric acid treatments can release certain metal stains from the surface. Follow with an appropriate sequestrant or metal-control program so the dissolved metal does not immediately redeposit.
Investigate the source. Test fill water, inspect heaters and metal components, review copper-containing products, and correct corrosive water conditions. Sequestering products control dissolved metal; they do not permanently remove an ongoing metal source.
Some products keep metals dissolved and reduce the chance of redeposition, while others are designed to help filtration capture them. These products may require maintenance doses because their effectiveness decreases over time.
When a mixed deposit is present, control the dissolved metal and then soften or remove the calcium scale. Treating only the visible color may allow the stain to return.
Algae
Brush all affected surfaces, maintain an effective sanitizer level for the pool’s cyanuric-acid concentration, improve circulation, and clean or backwash the filter as needed. Remove ladders, lights, and fittings when practical so hidden growth can be treated.
Recurring algae indicates that the sanitation, filtration, circulation, or cleaning routine still needs correction.
Surface damage
Stop repeated chemical treatments when spot tests produce no meaningful change and the finish appears pitted, cracked, faded, blistered, or delaminated. Document the area with close-up and wide-angle photographs and have the finish evaluated by a qualified pool-surface professional.
The area may contain permanent finish mottling, etching, fiberglass deterioration, or another form of surface damage.